
If you are craving something warm, comforting, and irresistibly cheesy but want to keep it entirely plant-based, this Vegan Cheese Tteokbokki (Cheesy Korean Rice Cakes) Recipe is an absolute game changer. Imagine chewy Korean rice cakes drenched in a luscious, creamy vegan cheese sauce that is bursting with flavor and texture, perfect for cozy nights or sharing with friends. This dish brings together the best of Korean street food vibes with a wholesome twist, making it a quick and satisfying feast that will have you reaching for seconds in no time.
Ingredients You’ll Need
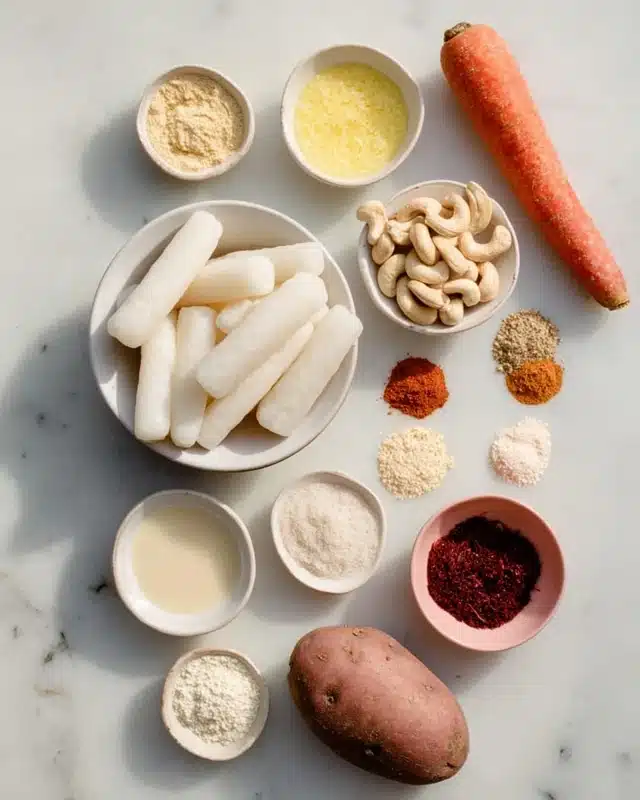
The beauty of this Vegan Cheese Tteokbokki lies in its simple yet important ingredients. Each element is thoughtfully chosen to build a rich, creamy sauce that complements the chewy rice cakes, providing that cheesy goodness without any dairy. Here’s what you’ll need to capture these vibrant flavors and textures:
- Small potato (120g): Adds natural creaminess and body to the cheese sauce for a thick, velvety texture.
- Half small carrot (50g): Provides a subtle sweetness and beautiful color to enhance the sauce.
- Cashews (2/3 cup, 86g): The foundation of the vegan cheese flavor with a smooth, rich base once blended.
- Cashew milk (1 cup, 250ml): Keeps the sauce silky and dairy-free, balancing thickness and creaminess.
- Vegetable broth (3/4 – 1 cup, 188 – 250ml): Adds depth and a slight savory note that enhances the overall flavor.
- Tapioca starch (3 tbsp): The secret to that slight stretch and gooey texture in the sauce.
- Nutritional yeast (1/4 cup): Brings cheesy, umami notes essential to the vegan version of this classic.
- Lemon juice (2 tbsp): A touch of acidity that brightens and balances the richness perfectly.
- Miso (1 tsp): Infuses a depth of savoriness with fermented goodness.
- Mustard powder (1/2 tsp): Adds a subtle zing that complements the cheesy flavor.
- Paprika (1/2 tsp), onion powder (1/2 tsp), garlic powder (1/2 tsp), and salt (1/2 tsp or to taste): These spices round out the flavor profile with warmth and balance.
- Korean rice cakes (2 lbs, 900g): The star of the dish – chewy, soft, and ready to soak up all that cheesy sauce.
- Korean red pepper flakes, scallions, and sesame seeds: Essential garnishes that bring color, crunch, and a kick.
How to Make Vegan Cheese Tteokbokki (Cheesy Korean Rice Cakes) Recipe
Step 1: Prepare the Rice Cakes
Begin by bringing a pot of water to a boil. Toss in the Korean rice cakes and cook them until they are soft and chewy, which usually takes just a few minutes. Once tender, drain the rice cakes and rinse them with cold water to stop the cooking process and keep their perfect texture intact. This simple step ensures every bite will be satisfyingly bouncy, ready to be enveloped in the cheese sauce.
Step 2: Blend the Cheese Sauce
While the rice cakes cook, gather all the cheese sauce ingredients—cooked potato, carrot, cashews, cashew milk, vegetable broth, tapioca starch, nutritional yeast, lemon juice, miso, mustard powder, paprika, onion powder, garlic powder, and salt—and place them into a blender. Blend everything until the mixture is completely smooth and creamy. This step is crucial as it creates that luscious, cheesy texture that makes this dish unforgettable.
Step 3: Cook and Thicken the Sauce
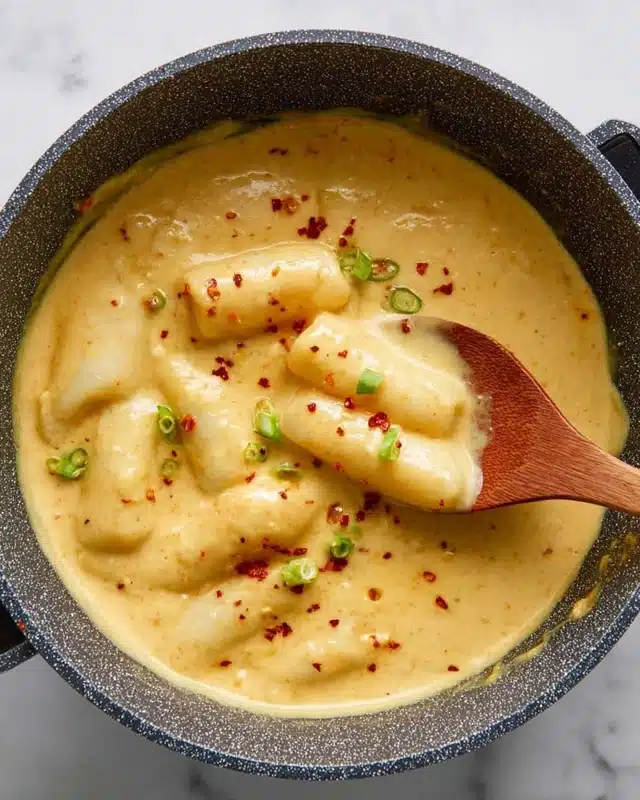
Pour the blended cheese sauce into a medium saucepan and set over medium heat. Stir the sauce continuously to prevent sticking and to help it thicken gradually. After about 5 minutes, it will start to stretch slightly and develop that beautiful gooey quality reminiscent of melted cheese. Reduce the heat to low to keep the sauce warm without burning, preparing it for the final step.
Step 4: Combine and Finish
Now, gently fold the cooked rice cakes into the thickened cheese sauce, making sure every piece is generously coated. This step transforms each chewy cake into a creamy, cheesy bite-sized delight. Once combined, the dish is ready to be plated. Be sure to serve it immediately to enjoy the sauce’s perfect creamy texture.
How to Serve Vegan Cheese Tteokbokki (Cheesy Korean Rice Cakes) Recipe
Garnishes
Enhance your Vegan Cheese Tteokbokki with some simple but impactful garnishes. A sprinkle of Korean red pepper flakes adds a tantalizing heat, while chopped scallions bring a fresh, vibrant crunch. Toasted sesame seeds offer a nutty aroma and subtle bite, elevating the dish visually and flavor-wise. These little finishing touches turn every mouthful into a festival of textures and tastes.
Side Dishes
While this dish is hearty on its own, pairing it with light, crisp side dishes can create a well-rounded meal. Try serving it alongside a crunchy cucumber kimchi or a refreshing sesame spinach salad to balance the cheese’s richness. Steamed edamame or pickled radishes also work beautifully, adding contrasts in texture and palate that complement the creamy tteokbokki perfectly.
Creative Ways to Present
For a fun twist, serve the Vegan Cheese Tteokbokki in individual shallow bowls topped generously with scallions and sesame seeds. You can also present it as a communal dish in a large skillet for sharing, keeping it warm on the table. Another idea is to wrap spoonfuls inside lettuce leaves with a sprinkle of chili flakes for a handheld, fusion-style snack that’s as playful as it is delicious.
Make Ahead and Storage
Storing Leftovers
If you happen to have any leftovers of this Vegan Cheese Tteokbokki, store them in an airtight container in the refrigerator. The rice cakes will absorb some sauce overnight, so the texture is best the day you make it, but it will keep well for up to 2 days. Before enjoying again, a quick reheat will bring it back to life beautifully.
Freezing
While the rice cakes do freeze well, the cheese sauce’s texture may change slightly after freezing due to the starches and cashews. If you want to freeze leftovers, do so in separate portions to minimize texture changes, and try to consume within one month for the best taste and quality.
Reheating
To reheat your Vegan Cheese Tteokbokki, do so gently on the stove over low heat. Stir often to prevent sticking and add a splash of water or broth if the sauce has thickened too much. This will help revive the sauce’s creamy stretchiness and ensure the rice cakes stay delectably soft.
FAQs
Can I use other types of non-dairy milk?
Absolutely! While cashew milk complements the flavors wonderfully, you can use almond, oat, or soy milk as alternatives. Just choose unsweetened varieties to maintain the savory balance.
Are the Korean rice cakes gluten-free?
Most Korean rice cakes are made primarily from rice flour and are naturally gluten-free, but it’s always good to check packaging to ensure no wheat products or additives were used if gluten is a concern.
Can I make the cheese sauce ahead of time?
Yes, the vegan cheese sauce can be made a day in advance and stored in the fridge. Reheat gently with a splash of broth or non-dairy milk before combining with the rice cakes for best results.
How spicy is this dish?
The heat level depends on how much Korean red pepper flakes you add as a garnish. The base Vegan Cheese Tteokbokki is mild and creamy, making it perfect for adjusting to your spice tolerance.
What if I can’t find Korean rice cakes?
If Korean rice cakes aren’t available, you can try substituting with gnocchi or soft mochi, though the texture and taste will vary slightly. Specialty Asian markets online often carry authentic rice cakes.
Final Thoughts
This Vegan Cheese Tteokbokki (Cheesy Korean Rice Cakes) Recipe is a heartwarming dish that brings together irresistible textures and flavors in a way that feels like a special treat yet is incredibly easy to whip up. Whether you’re craving a cozy solo dinner or sharing with friends, this dish promises comfort, richness, and joy in every bite. Give it a try—you just might find your new favorite vegan comfort food!
Print
Vegan Cheese Tteokbokki (Cheesy Korean Rice Cakes) Recipe
- Total Time: 30 minutes
- Yield: 4 servings
- Diet: Vegan
Description
This Vegan Cheese Tteokbokki features chewy Korean rice cakes drenched in a rich, creamy, and flavorful vegan cheese sauce made from cashews and vegetables. It’s a comforting, quick, and easy recipe perfect for lazy nights or when craving Korean street food with a plant-based twist.
Ingredients
Cheese Sauce:
- 1 small potato, cooked (120g)
- 1/2 small carrot, cooked (50g)
- 2/3 cup cashews (86g)
- 1 cup cashew milk (250ml, or any non-dairy milk)
- 3/4 – 1 cup vegetable broth (188 – 250ml)
- 3 tbsp tapioca starch
- 1/4 cup nutritional yeast
- 2 tbsp lemon juice
- 1 tsp miso
- 1/2 tsp mustard powder
- 1/2 tsp paprika
- 1/2 tsp onion powder
- 1/2 tsp garlic powder
- 1/2 tsp salt, or to taste
Rice Cakes and Garnishes:
- 2 lbs Korean rice cakes (900g)
- Korean red pepper flakes (to taste)
- Chopped scallions (for garnish)
- Sesame seeds (for garnish)
Instructions
- Cook the Rice Cakes: Bring a pot of water to a boil and add the Korean rice cakes. Cook them until they become soft and chewy, which usually takes a few minutes. Once cooked, drain the rice cakes and rinse them with cold water to stop the cooking process and prevent sticking.
- Prepare the Cheese Sauce: Place the cooked potato, cooked carrot, cashews, cashew milk, vegetable broth, tapioca starch, nutritional yeast, lemon juice, miso, mustard powder, paprika, onion powder, garlic powder, and salt into a blender. Blend everything together until the mixture is completely smooth and creamy.
- Cook the Cheese Sauce: Pour the blended cheese sauce into a pot over medium heat. Stir constantly to prevent sticking and to encourage the sauce to thicken. Continue cooking for about 5 minutes, until the sauce thickens and starts to stretch slightly, indicating the tapioca starch is working.
- Combine Rice Cakes with Sauce: Reduce the heat to low and fold the cooked rice cakes into the thickened cheese sauce. Stir gently to evenly coat all the rice cakes with the creamy sauce.
- Serve and Garnish: Serve the vegan cheese tteokbokki immediately, garnished with chopped scallions, toasted sesame seeds, and a sprinkle of Korean red pepper flakes for a bit of heat and color.
Notes
- Helpful Equipment: blender, saucepan or pot, spatula or wooden spoon for stirring.
- Make sure to blend the cheese sauce ingredients thoroughly to avoid any lumps for a smooth texture.
- Adjust the amount of vegetable broth in the cheese sauce to achieve desired thickness.
- Use Korean rice cakes (tteok) specifically for authentic texture and flavor.
- Nutritional information is an estimate based on standard ingredient values and may vary depending on brands used.
- Prep Time: 10 minutes
- Cook Time: 20 minutes
- Category: Main Course
- Method: Stovetop
- Cuisine: Korean


